

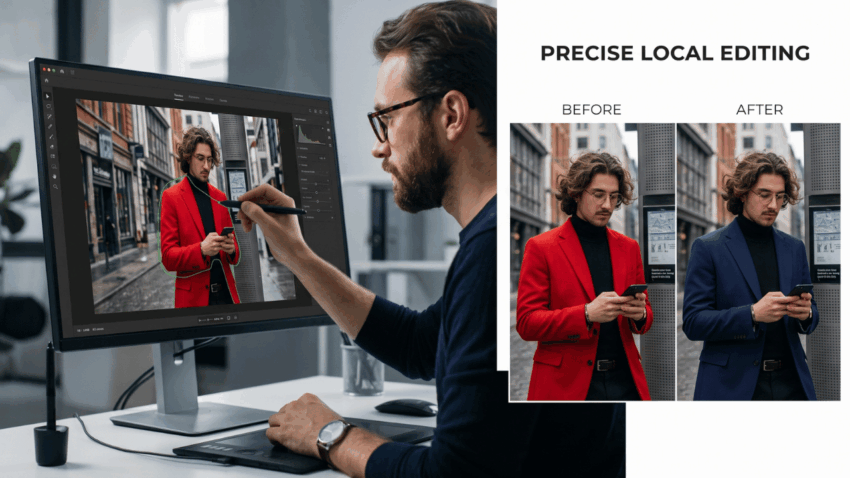
A local image edit has two instructions, even when the request sounds simple. One region must change; everything around it must remain acceptable. If a sleeve turns blue but the face shifts, the type moves, or the product gains a new edge, the edit has failed despite obeying the most obvious part of the prompt.
Seedream 5.0 Pro is ByteDance’s image model. ByteDance’s official product presentation includes point, lasso, box, and sketch-based precise editing. A third-party interface or API route may expose a narrower set—generation, image-to-image, or multiple references rather than an interactive selection tool. No route guarantees that unselected pixels will stay fixed, so the workflow must match the controls that are actually visible and include a comparison of protected areas.
Write a Change-and-Protect Contract First
Before uploading the image, describe the edit in two columns. The change column names the target region, desired result, and permitted adjustment around its edge. The protect column names everything that must not move or be reinterpreted.
For a jacket-color edit, the contract might say:
- Change: jacket fabric only, from rust red to deep navy; preserve weave and folds.
- Protect: face, skin, hair, hands, shirt, buttons, background, crop, lighting direction, shadows outside the jacket, and all text.
This is more useful than “make the jacket navy.” Keep the contract beside the source image throughout the edit rather than trusting the last prompt in the interface.
Save an untouched master and give the edit a new version number.
Confirm Whether the Interface Provides a Real Selection
Look at the actual Seedream 5.0 Pro surface before planning the operation. If point, lasso, box, or sketch controls are available, select the smallest region that contains the intended change. A box is quick but may include unwanted background. A lasso can follow an irregular garment or product edge. A point may identify an object without defining every boundary. A sketch can indicate a new form or placement.
The current ClipDance configuration exposes text-to-image and image-to-image with reference uploads, but not the official point, lasso, box, or sketch selection controls. Its seedance 2.5 route belongs to the video workspace and does not add those missing image-selection tools. Treat the Seedream route as a guided full-image edit and expect a stricter whole-frame review. A reference upload supplies guidance; it is not a locked layer or a pixel-level guarantee.
For a mission-critical edit that requires every surrounding pixel to remain identical, use a conventional image editor to isolate the region and composite the accepted result back over the untouched master. The model can propose the local change while the editor controls the final boundary.
Select the Smallest Area That Includes Its Natural Edge
A selection that is too broad gives the model permission to reconsider nearby objects. One that is too tight can cut across the shadow, reflection, hair strand, seam, or soft transition that makes the edited object belong in the scene.
Include the target and a narrow amount of relevant edge context. For a mug color change, the selection may need the handle boundary and the mug’s own highlight, but not the hand holding it. For replacing a sign, include the sign face and its border while protecting the wall texture and mounting hardware unless they must change.
After drawing the region, zoom in around the perimeter. Check narrow gaps, holes within an object, transparent material, and reflected color. Record whether shadows and reflections are allowed to adapt; otherwise the new object color may conflict with the unchanged environment.
Give Each Reference a Named Role
References are most effective when they do not compete. The source image controls composition and all protected content. A material swatch may control the new fabric. A product photograph may define the replacement object. A portrait reference should control identity only if a face is involved in the selected area.
Write that hierarchy explicitly:
Source image controls crop, person, pose, background, light, and all unselected content. Reference two controls only the navy wool texture inside the jacket region. Do not transfer its buttons, cut, folds, or lighting.
Avoid adding a general mood image during a precise correction. It may invite a global shift in color or contrast. If the edit needs a new texture and a new color, establish one first, approve the protected regions, then introduce the other as a separate version.
Use only references authorized for transformation and publication.
Prompt the Local Change in Observable Terms
State the region first, then the exact modification, edge behavior, and protect list. Replace vague art-direction words with features a reviewer can see. “Make it cleaner” could change the whole frame; “remove the small scratch from the upper-right corner of the phone screen while preserving reflections, bezel, hand, background, crop, and color” has a bounded outcome.
When changing an object, name the properties that remain: silhouette, size, perspective, position, material response, or printed mark. When removing an object, specify how the revealed area should be reconstructed from its immediate surroundings. When inserting one, define contact, scale, and shadow so the new element does not float.
Do not combine several unrelated repairs in one prompt. A local color correction, logo replacement, facial expression change, and background cleanup require different boundaries and acceptance criteria.
Make One Variable Move Per Version
Start from the untouched master or last fully approved version. Submit one bounded change, save the result, and compare it before continuing. If it passes, that file can become the source for the next edit. If it fails, return to the previous approved file rather than trying to repair several unintended changes on top of one another.
Use filenames that expose the experiment: “v03-jacket-color,” “v04-jacket-texture,” and “v04b-jacket-texture-edge-fix.” A folder full of “final” files hides the edit history and makes rollback unreliable.
If an edit repeatedly changes a protected face, crop the task more tightly or isolate the target in a conventional editor. Another round of increasingly forceful “do not change the face” language may still leave the face inside a full-image transformation.
Inspect the Protected Areas Before Judging the Edit
Review the source and candidate at the same scale. Begin outside the edited region: face geometry, hands, typography, logo shape, product edges, horizon, crop, and background objects. Then inspect the selection boundary for halos, seams, duplicated texture, broken shadows, and color spill.
An opacity blink or difference view in a conventional editor can reveal shifts that side-by-side thumbnails hide. Pay particular attention to small text and repeated patterns. A generated edit may look cleaner at first glance because it quietly redrew those details.
Only after the protect pass should you judge whether the requested change itself works. This order prevents an attractive new color or object from distracting the reviewer from damage elsewhere.
A batch-editing system can submit supported image work through reAPI. The service aggregates several model routes, but a Seedream request still enters through the image endpoint, returns a task ID, and must be checked for completion. reAPI is separate from ClipDance and cannot turn a full-image API route into the official Seedream selection surface; the available controls and output still need route-specific review.
Common Questions About Local Seedream Edits
Does an unselected area stay pixel-identical?
Do not assume it does. Compare the candidate with the untouched master, and use compositing when exact preservation is required.
Should the selection include shadows and reflections?
Include those that must naturally respond to the new color, material, or object. Protect unrelated shadows and write the intended boundary into the change contract.
Can several references improve a small edit?
Only when each source has a distinct role. Extra references can introduce conflicting shape, light, texture, or identity information, so use the smallest set that defines the requested change.
Sign Off the Protect List on the Exported File
Reopen the final export beside the untouched master and the change-and-protect contract. Mark each protected item as unchanged or explain an approved exception. Zoom around the entire selection edge, then verify text, faces, marks, and product geometry at full size.
Have the reviewer sign the exact filename, not the generation thumbnail. If any protected element moved without approval, return to the last passing source, narrow the selection or prompt, and rerun that single edit before the file enters the delivery folder.
